
Building and Deploying Jekyll Sites using Docker - Part One
I’m a big fan of Jekyll when it comes to static sites, such as blogs, documentation etc.
Over two posts, I’m going to describe how I’m using Docker to make local Jekyll site development easier, and then how I can use the same technique to make CI builds of Jekyll sites in Travis CI or Azure DevOps easier to set up.
Part 1 focuses on the local development side of things.
The Problem
This blog is a static site build with Jekyll, and then hosted on GitHub as a GitHub Pages site. When I commit changes to Github, Travis CI builds the site to check for any issues.
I also use Jekyll at work, to build documentation sites. In general, the markdown for these sites is hosted in Azure DevOps, and the sites are hosted as Azure Web Apps.
In both situations, I want to be able to quickly edit content, build and serve the site locally, and then publish the changes with the minimum of effort. However, Jekyll normally requires you to have set up a Ruby development environment in order to run and build your web site. That’s fine if you’re already using Ruby for other things, but I’m not, and so I’ve found myself spending way too much time setting up or updating Ruby, and the gems used by my sites.
This is an even bigger problem if you’re trying to convince other people to help make edits to sites. The overhead of setting up your machine is just too high.
However…
I use Docker for lot of stuff, and so I’ve discovered a way to avoid the headaches of setting up a Ruby dev environment, and the same approach makes my CI builds much cleaner too.
Jekyll Images on Docker Hub
To avoid having to install Jekyll at all, I’m using the following Docker images…
https://github.com/envygeeks/jekyll-docker
There are three images available:
jekyll/jekyll: Default image.jekyll/minimal: Very minimal image.jekyll/builder: Includes tools.
I’m using the jekyll/jekyll image for local development, and the jekyll/builder image for CI builds.
Building the Jekyll sites locally
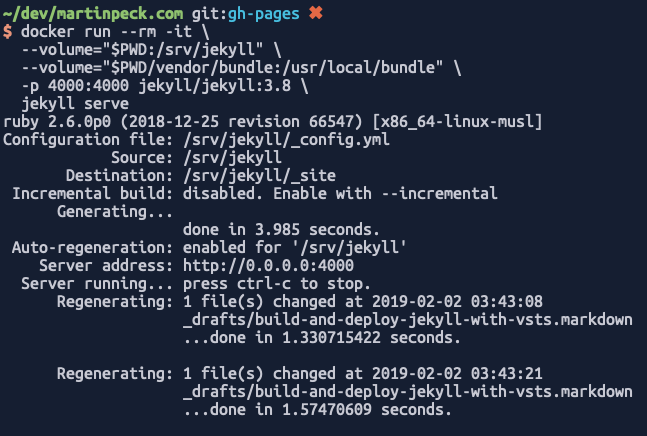
When I want to build my Jekyll site locally, and test content changes, I use the following commands:
docker run --rm -it \
  --volume="$PWD:/srv/jekyll" \
  --volume="$PWD/vendor/bundle:/usr/local/bundle" \
  -p 4000:4000 jekyll/jekyll:3.8 \
  jekyll serve
This command will…
- run a container with the
-rmflag, which removes it once the container exits - map the current working directory to the
/srv/jekyllfolder in the container so that Jekyl, within the container, can build the site - map the
vendor/bundlefolder within the current directory to the/usr/local/bundlefolder within the container. This allows the gems to be cached, and reused in subsequent builds - map port 4000 in the container to port 4000 on the host
- use the
jekyll/jekyll:3.7.4tagged container - issue the
jekyll servecommand, so that the site is built and then served on port 4000
After running this, I can then hit http://localhost:4000 and view the site. Also, as I make changes to the content Jekyll will continue to re-build and serve the changes.
If I simply want to build the site, and generate the _site folder with the static content, I can use the following command:
docker run --rm -it \
  --volume="$PWD:/srv/jekyll" \
  --volume="$PWD/vendor/bundle:/usr/local/bundle" \
  jekyll/jekyll:3.8 \
  jekyll build
This does much the same thing, but doesn’t serve the site on a local webserver.
So, now I’m able to build and serve my Jekyll site locally, without having to set up and install a Ruby environment. Yay!
Conclusion
Using these Docker images has allowed me to have a much cleaner local machine setup. When I set up a new laptop I simply install Docker (which I would end up doing for many other reasons) and then use Docker to build my Jekyll sites.
In Part 2 I’ll describe how using these Docker images makes the set up and deploy of the site much easier in Azure DevOps, and how it can also be used for Travis CI builds.